Showing posts with label Main Dish. Show all posts

Monday, January 2, 2017

Quiche

Growing up, we had hamburger quiche often, possibly weekly. Usually flavored with ground hamburger and cheddar, I've taken our family recipe and created a new take on this classic. There are so many options, so feel free to create your own!


1 unbaked pie shell
1/2 lb ground turkey
1/2 C onion
1 t olive oil
1/2 C mayo
3 eggs
1 1/2 T cornstarch
3/4 C milk
2 1/4 C yellow shredded cheddar
1/2 of a red pepper, diced
10 sprigs of fresh thyme


1. Saute 1/2 C onion in olive oil until translucent. Add ground turkey and sauté until lightly browned and cooked through. Drain and set aside.

2. Preheat oven to 350 degrees.

3. Combine 1/2 C mayo, 3 eggs, 1 1/2 T cornstarch, 3/4 C milk. Mix well and then add 2 1/4 C shredded cheddar, diced red pepper and the leaves from 10 sprigs of fresh thyme. Once evenly combined, stir in the meat mixture.

4. Pour into pie shell and bake for 35 - 40 minutes.


Here's another flavor combination to try:

1 unbaked pie shell
1/2 lb ground turkey
1/2 C onion
1 t olive oil
1/2 C mayo
3 eggs
1 1/2 T cornstarch
3/4 C milk
3/4 C white shredded cheddar
1 1/2 C mozzarella
1 box of frozen spinach defrosted
2 cloves of garlic, minced


Thursday, August 29, 2013

Mac & Cheese

This dish is special and a real crowd pleaser. With a little extra time to go the homemade route rather than straight from a box, you can blow away your family and friends. This easy Mac & Cheese recipe is so far the most requested dish Brian and I have ever made. Originally based on one of Martha's recipes, we've taken the basics and made it our own - you may want to do the same as it's really pretty customizable. This dish was also a great excuse to invest in new kitchen tools... If you don't already have a microplane for grating cheese, consider getting one. Makes this recipe go so much quicker! Well without further ado, here's our delicious version of Mac & Cheese.

Topping:
3 T unsalted butter, melted
1 1/2 C bread crumbs
1 C Vermont white cheddar (Sargento)


Ingredients:
5 1/2 C milk
6 T flour
6 T salted butter
4 C Vermont white cheddar (Sargento)
1 Block fontina (Approx. 0.5-0.7 oz)
8 pieces of Land o'Lakes american cheese
1/4 t pepper
2 t kosher salt
1/4 t nutmeg
1/2 t Italian seasoning
1/4 t smoked paprika (strongly suggested)

1. First put pasta water on to boil. Cook 1 lb elbow pasta 1 minute less than recommended on package. Once cooked, strain and rinse with cold water until pasta is cool. While you are waiting for the pot to boil or pasta to cook, grate your block of fontina cheese and set aside.

2. Melt 3 T butter in a fry pan. Add 1 1/2 cups of bread crumbs to the melted butter and set aside. Measure out spices and set aside.


3. In a small sauce pan, warm 3 1/2 cups of milk. You just want to take the chill out of it, not boil it! Put the remaining 2 Cups of milk in a Tupperware container with the 6 T of flour and shake it together. Once no lumps are seen, add this to the rest of the warming milk.

4. In a separate (larger) pan, slowly melt butter. Add milk/flour mixture to this pan and turn heat up to high. Wisk vigorously until mixture comes to a full boil. Make sure this gets to a thick gravy consistency - if not there by the time it boils, cook a few more minutes.


5. Add salt, pepper and all the spices. (This part if customizable so if you prefer a different blend of ingredients, here's one of the areas you can customize.) Stir in spices and then slowly add all the cheese stirring constantly until completely blended. The cheese combination is also customizable. Jarlsberg is a great sub for Fontina giving a bit more of a bite. We haven't tried yet, but regular or smoked gouda is a sub for the Fontina as well. Experiment to find your favorite blend.

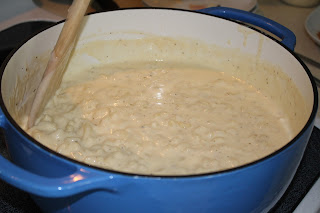
6. Combine pasta into the cheese mixture. Stir gently so as not to break the pasta apart. This should appear very soupy looking. Let mixture sit while you pre heat oven to broil. Mixture can also be set aside until ready to serve.


7. Pour Mac & Cheese into a 13x9 pan. Top with 1 cup of cheddar cheese and bread crumb mixture. Broil until bread crumbs brown approx. 5 minutes. (NOTE: if you don't like a saucier mac and cheese, bake for 25 minutes on 350 rather than broil topping. If you choose to do this, brown bread crumbs in the fry pan when you combine with the butter.)

As you can see, lots of ways to do this, but now you have the way we love it! I couldn't get a shot of the finished product before everyone dug in, so here's a half eaten one :)


ENJOY!


Friday, August 9, 2013

Sausage Breakfast Casserole

My favorite meal is breakfast and I will eat it for ANY meal. I find it hard to cook when company comes over since its such a "made to order" meal but I found this breakfast casserole which is very simple to make and with a few tweaks to the original recipe, absolutely delicious. It's turned into a tradition to make this for Christmas day because it can cook while we open presents and can feed a large group of people. I don't recommend making it the night before but you can prep a few things to make throwing the dish together super easy.


2 16oz packages of sausage (I use Jimmy Dean Regular)
1 white or sweet onion, copped
1 extra large green pepper, chopped
3 C frozen shredded hash browns (Ore Ida is best)
3 C cheddar cheese divided
1 C bisquick mix
2 C milk
8 eggs
Salt & Pepper to taste
13x9 baking dish

1. Pre-heat oven to 400 degrees. Saute peppers, onions and sausage over medium high heat until sausage is no longer pink, but not fully cooked. (This you can do the night before to save time. Just take out of the fridge in the morning and let warm to room temperature before proceeding.)
2. Drain sausage mixture and put into a greased 13x9 baking dish. Add 3 C frozen shredded hash browns and 2 C cheddar cheese. Mix in the pan until blended well.
3. In a separate bowl, wisk 1 C bisquick with 2 C milk and 8 eggs. Add salt and pepper to taste.
4. Pour bisquick mixture over the ingredients in the baking dish, coating evenly.
5. Bake at 400 degrees for 40 minutes or until top starts to brown and a knife comes out clean from the middle.
6. Top with remaining 1 C of cheddar cheese and put back in the oven for 1-2 minutes to melt.
7. Let sit for 5 minutes, cut and serve. Feeds 12-15.


Breakfast for lunch anyone? Enjoy!


Thursday, July 25, 2013

Grilled Beer Can Chicken & Bourbon Butter Glaze

This is the first meal my boyfriend cooked for me when we started dating. I think he had me at first bite! The rub and the glaze are an amazing combination, totally worth all the effort it takes to make. Before attempting this one, head to your local Christmas Tree Shops or Target and grab a Beer Can Chicken stand that allows the chicken to stand up on the grill over the can.


Approx. 4 lb chicken
3 tsp rub (recipe below)
1 can of coke
Bourbon Glaze
Beer Can Chicken Stand

Rub Ingredients:
2 tsp smoke paprika
2 tsp kosher salt
1 tbsp sugar
1/2 tsp freshly ground pepper
1/2 tsp cumin
1 tsp garlic powder
1/2 tsp chile powder
1/2 tsp cayenne pepper

Bourbon Butter Glaze
6 oz butter (cut into small pieces)
1/4 C brown sugar
2 tbsp bourbon
1/2 lemon (juiced)
1 tsp kosher salt
1/2 tsp freshly ground pepper

1. Remove gizzards then wash and dry chicken. 

2. Combine ingredients for rub and mix well. 

3. Open coke and pour out 1/4 of the coke. (We use coke instead of beer because it adds great caramel flavor to the chicken, but beer works too!) Using a knife or can opener, cut off top of can carefully. Add 1 tbsp of the rub to the remaining coke in the can. Place can in the beer can chicken stand.

4. Place chicken on the stand, sliding the opening of the cavity over the can so its standing up. Rub entire chicken with rub and set aside. 

5. Pre-heat grill to medium high heat. 

6. In a small sauce pan, melt the butter for the glaze and then add the rest of the ingredients. Boil for two minutes stirring vigorously with a wisk. 

7. Cook chicken on the grill over direct heat one hour basting every 10-15 minutes with bourbon butter glaze. Wait until chicken reaches 175 degrees in the thigh. Remove from the grill and let sit 10 minutes. 

Bon Appetit!